Two Go Mad In The Garage

How two numpties try to build a Westfield kit car.

Saturday, July 29, 2006

Some help and a flat battery


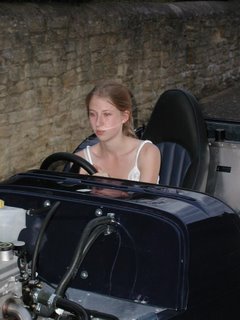
SteveC (pictured) who made some suggestions on the WSCC web site, and who lives close by, stopped by and offered some advice on the build and our current obstacles.

He explained why taking the plugs out was such a good idea for getting engine lubrication prior to any combustion - plugs out = no compression = faster rotation on the starter = higher oil pressure = better oil distribution.

Steve spotted several other things that may be of use going forward, but we also found that the engine earth was not connected (doh!) although this is unllikely to be the cause of our fuel pump problem it is good to identify it now.

However the other little equation that is relevant here is flat battery = no rotation -= no oil pressure!!!!

So battery is charging.

Tuesday, July 25, 2006

Immobiliser

Won't do any posts before the weekend, when Tim will get a chance to look at the car.

It has been suggested that the immobiliser circuit is operating and this needs a loop back on it to disable it. Apparently the immobiliser will stop the fuel pump working.

Friday, July 21, 2006

No combustion....


Well we went for it.... we finished the wiring with some help from Mark via email. We put the battery in and some fuel in it.

Then we spent half an hour or so taking it off the stands which was difficult with only one jack and the stands at max height.

We did this as a multi-stage process - the last stage being to rest the two nearside wheels on some wood so we could get the jack out.

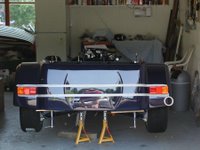
Here you can see Chrissy sitting in it while it still resting on the wood.

From the front and the back....


Then courtesy of 'er indoors we pushed the car out and up the drive ...didn't want to burn the house down in case of a fuel fire.

And turned the ignition on...

First the good news...the heater fan works! so does most of the lights and the engine does at least turn over, but no sign of life as far as combustion is concerned....

Also worrying is no sign of oil pressure on the indicator dial.

Here we are trying to start it...perhaps a caption competition!....

Thursday, July 20, 2006

It's getting wet in there


Some stirling work by Chrissy got the heater re-installed and the header tank fixed back on while Tim was at work. So we then connected all of the hoses around the scuttle and then filled with water (no anti-freeze yet as we rightly assumed there would be some leaks).

We are charging the battery up and we have connected more, if not all, of the dashboard connections.

It's looking like tomorrow we might be ready for ...beep...."this is houston you are go for main engine start"...beep.

However the chances of it actually firing up seem remarkably low and Tim is worrying about putting power throught the loom given the number of possible shorts/bog ups/misconnections.

Wednesday, July 19, 2006

header tank on / Dashboard getting closer

We put the header tank on tonight, and spent most of the rest of the itme on the dashboard, which Chrissy worked on while Tim was at work.

Here you can see front and back but we still have a number of questions to find answers to before we have everything connected.


One of the challenges that fellow builders might be interested in is the consequences of using the Smith's white dials rather than the standard VDO black dials.


As mentioned earlier you will already have found that the speedo runs from the front rather than back wheels --which will later lead you to interesting conversations at the SVA test centre I understand...Now you discover that there are a few other little jobs to punish you for the vanity of wanting white dials.

First you may discover that there are only 4 dip switches not the 6 the manual mentions on the back of the tacho, Mark says 'just leave them alone' so we will.

But you will also need to swap two of the wires (a and B as shown) on each of the connectors on the loom that feeds the three small dials (oil pressure etc.). The diagram to the left shows the connectors. The spade connectors however need a pin or nail inserted into the little hole shown to allow them to be released

Tuesday, July 18, 2006

Dashboard (first of many times)

We made a start on the dashboard tonight, drilled three of the ten or so holes through and secured with some bolts. Several kind sources of advice suggested drilling slowly with a hand drill through the 'leatherette' ...sounds worse than it looks...dashboard cover material and this indeed seemed to do the trick. We cut out the material to allow the lights and switches, and marked up also for the header tank fixings. Struggling with some of the wiring for the dash though...it appears the Smiths dials take different wiring to the standard VDO ones and so rewiring of the connector blocks is required, but I'm b*****ed if I can get the spade connectors out of the blocks.

Monday, July 17, 2006

Solo working


Chrissy has gone away for a couple of days to be in some competiton in London, so Tim is working on alone as we'd really like to get the engine started this week before Chrissy goes away for most of the summer.


Tonight Tim successfully adjusted the fuel filler fixing holes - just as well he did as looking down the filler pipe with the cap removed showed a pile of rubber shavings from where we had hacksawed the pipe to the right length.

Anyway this seemed to go well enough - and pictures from inside and outside are shown.

Tim then fitted one of the seats, partly because this looked easy
and partly because if we are going to work on the dash then being able to do so from a seat would be good. Obviously the seat will have to come out later to fit interior trim and carpets.

Sunday, July 16, 2006

Body Rivetting and Fuel Filler


We have spent a lot of hours today and made some reasonable progress, but writing it down now it doesn't seem like much return for the investment!


We started with 45 minutes of tidying up the garage, which as always gave us both rotten hayfever. Then after a short break to recover and check on the cricket score, we checked alignment of the panels (which meant once more getting all scuttle/boot box/bonnet/nosecone) down from their various locations in the house.

We also tried to get the wheels equally spaced in the rear wheel arches, but weren't aiming for perfection in that. The boot box certainly fits better now we have adjusted the body a bit with the dremmel.

We don't like the way the bonnet sits much esp where it joins the scuttle but overall it isn't too bad. We then put a couple of rivets into the tabs where the roll bar goes and (shown above) jacked up the rear bodywork and used some clamps to allow the rear skirt to be riveted in place. Measuring and drilling from underneath wasn't easy...
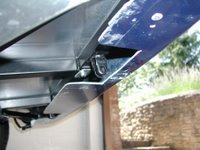
Here is a picture from underneath.

Having got the rear skirt riveted up we took the trolley jack away and got to work on the rear fuel filler.

This took several hours of thinking and working, and even now it isn't finished..

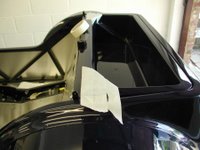
First we marked the inside of the body using a pencil and a ruler to project some points onto the masking tape, then we drew around the plastic cap that had temporarily covered the fuel tank to allow us to get a centre point... then using a dremmel with flexible attachment we drilled inside out a small pilot centre hole

Then we used that as the guide for a 64mm hole saw, the book said the hole should be 65mm dia. but in fact even a 64mm saw gave a hole slightly too big.

Still at least we got excellent alignment between the fuel tank filler pipe and the hole we cut by this method.

We wet and dried the edges to clean it up and then did a poor job of drilling out the holes for the fixing screws. This was very difficult as our slightly oversize hole meant the fixing holes were very close to the edge - eek!

We then cut the large flexible(ish) tube to join the rear body to the metal tank down to size - obviously this needed several goes, and then a fair amount of effort to get it on the tank.. finally we fitted the fuel filler cap, gasket and locking ring, as shown below... Tomorrow we'll have to take it off again as the fixing bolts don't really line up well enough and given the closeness of the fixing holes to the edge of the big hole, we don't want to put strain on this.
Our list of things to do before test engine start now looks like this

Finish Fuel Filler
Cut ali plates to hold rivnuts behind dash
Put Rivnuts on rear of scuttle to hold dashboard

Dashboard build up
Radiator Overflow Pipe
Header tank
Heater
Fill with water/petrol/oil
Big Check
Fit battery
Fit and tighten wheels
Take of stands and push out
Engine start (need insurance and extinguisher)

We think this is the min. list to get going, note things like heater are not because we are worried about getting cold this sunny July, but because it is integral to the cooling system.

We will have to take some of these bits off again, but our logic is that we should get engine started before we bolt the body too firmly into place.

Saturday, July 15, 2006

body off and on again

We took the body off this morning, and tidied up the wiring loom where several parts of it join in front of the pedal box. There is no nice way to arrange the wiring so it lies neatly so just did what we could with convoluted tubing and cable ties. After carrying out various wiring loom jobs we wanted to test the loom before putting the body on, in particular wanted to check that the positive battery cable didn't short to earth. The thinking was that if we were going to debug the loom then we'd be better to do that before the body was fixed in place.
We didn't connect the Engine Management Unit as the connectivity tester was 9V and might damage it.

Anyway it seemed to show a short - ho hum! Several phone calls to Father/Grandfather Bob later combined with some selective disconnecting of loom bits and using a multimeter allowed us to conclude that all we were seeing was some connections via diodes in the alternator i.e. it wasn't really a problem.

Thanks to Bob (and by the way we have now changed the AA cells in the multimeter, found a note in the box telling Tim to change once a year - note dated 1999 - so only six years too late!)

Whilst we had the body off we also 'dremmelled' away a bit of the body to allow a better dit onto the chassis at one point where we had noted it fouling on a prominent weld - this seems to have worked and on refitting the bootbox sits rather better.

Chrissy tidied up the exhaust hole in the body with wet and dry, and we tightened up the fuel tank and did a few other jobs before putting the body and exhaust back on. It doesn't sound very much but we probably spent a total of 6 man/woman hours on it today.

Friday, July 14, 2006

Exhaust fits but at a cost

The exhaust now has been made to fit through a body hole that we seemed to just keep having to widen. Thanks to the folks at wscc and mark at westfield for some clues.

The whole garage seems to be full of GRP dust as a result so Tim did some spring cleaning (sporting a face mask) this evening.

We had a slight mishap, in that to make the exhaust fit we loosened the engine crankcase breather plate to help wiggle the exhaust manifold through and when retightening the fixing bolts someone overtightened one of the bolts and it snapped off leaving the end in the blind hole in the crankcase. I shall report this to her first RAF engineering commanding officer if she is successful in getting her RAF sponsorship!!

I have ordered a set of screw extractors from ebay (£1.49 + £1.99 postage), but actually it is probably not the end of the world as the pate seems to be securely held by the other two bolts.

We still need to tidy up the edge of the hole we have cut with wet and dry, but we'll do that when we take the body off tomorrow.

Monday, July 10, 2006

retired hurt

We used a power sander to make the exhaust hole in the body bigger and neater tonight, but after an hour of iterative sanding, trying the manifold/down-pipe and finding it wouldn't fit we gave up as Tim had a headache from noice/heat/sickly sweet smell of GRP dust (mask and goggles notwithstanding).

No work for next couple of nights as Tim has work commitments.

Sunday, July 09, 2006

A Crack in the Body!


First the bad news, we have spotted a crack in the gelcoat. Don't know how bad or repairable this is yet, but can't do much about it at the moment.

We went to a westfield club meeting today, but due to iffy weather and the fact that we had to go early only saw three cars, and none very similar to our build. We learnt several things, but one of them is that aiming for perfection is probably silly. We made several other breakthroughs today (or at least we think they are). Firstly we discovered that the nosecone needs some spacers underneath it, this lifts it up a bit and solves the alignment problems we had been having, we got back from the pub and drilled out the holes joining bonnet and nose cone and temporarily joined them with M5 bolts and this seemed to get a nice alignement. Though later on we have to replace bolts with dowel and large rubber grommet, it remains to be seen if alignment will be as good when we have done that.

Chrissy went off to a party (lightweight) so Tim got himself covered in GRP dust by drilling out an exhaust hole (although it needs a lot of enlargement to get to the right size.

Our technique was to drill inside out using the template we had made from cardboard, and drill inside to out using the flexible drill drive that reminds me of nothing as much as an endoscope!

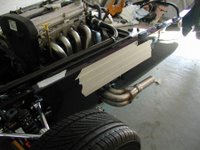
Then this gave some ranging holes (middle photo) and used those to set a first cutout.

Saturday, July 08, 2006

Still struggling with body panel alignment

We have worked on a number of things in the last couple of days, but it's relatively slow.

We stuck the demister air distributor onto the back of the scuttle using some tiger seal. Hope it's in the right place, as have seen others struggle later with windscreen wiper boxes.

And we have done the fiddly work of completing the wiring on all of the lamps at the rear.

We have adjusted the position of the reversing light a little by widening the hole at the top and putting some tiger seal at the bottom - crude but seems to work.

Here you can see Chrissy completing the convoluted tubing runs around the wiring...dressed in the total protective clothing of one strappy top!

We have also taken some advice from Mark on the body panel problems and made a little progress but not really solved our two issues. We clamped the nosecone to the bonnet in the garden, off the car, this showed that we did indeed need to remove a little more of the offside bonnet inner lip, but even doing that we aren't getting a great fit. The sides can be made to line up, but the top has a bit of a step in it, and can't see any way of resolving that.

Still planning to go the Wedtfield Thames Valley club meet tomorrow to see what others have done (now that's what real kit car building - research in a pub!)

The car looks misleadingly headed towards completion, but we still have
to take the body off again to tidy up underneath it and cut the exhaust pipe hole out.

Tuesday, July 04, 2006

keeping our hand in

A couple of little items of work tonight just to keep our hand in, avoiding solving body problems right now... so Tim soldered up the AMP connectors on the rear light indicators (and burnt himself!) and then at least for the nearside light we fitted it on and put convoluted tubing around the wiring to protect it from anything thrown up by the rear wheels.

Chrissy pretty much finished off the wet and dry work on the demister vents.

Too boring to put any photos up!

Sunday, July 02, 2006

Too hot to work


Funny how in the cold days of winter you don't really want to be working in the garage, yet today was so hot that we didn't want to do more than an hour and a half each.

Chrissy has been valiantly wet and dry-ing the demister slots as you can see here....

She has done the two to the right of the photo. but not the one on the left yet...

Still struggling to get the nosecone bonnet to align, removed some of the inner offside lip of the bonnet in the hope this might allow better alingment, perhaps there is some slight improvement but it's nowhere near enough...


Put a couple of rivets in the body and then put the boot box in the hole, but that doesn't seem to fit too well either, so we went in a bit fed up..


Saturday, July 01, 2006

Rear Lights and other little jobs


Still undecided what to do about the body not fitting well and so don't want to start fixing it until we have thought that one through a little.

So we got on with some other bits and pieces. We p-clipped the little cooling pipe to the car just over the footwells - using self tappers.

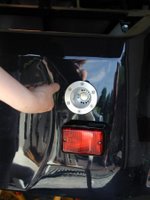
Tightened up the earthing strap from the ECU and fixed the ECU plate at the front with cable ties (not the most elegant solution but it works fine). Then we got on with the rear lights. We had mad a little start on this earlier in the week. Getting them positioned nicely is a real pig, there are no nice sharp lines to measure from (the top and bottom of the body curve away) and even a spirit level won't help much as the car is on stands and not very level.

Most of the drilling done with masking tape and by eye. Think we messed up the fog lamp slightly (not shown in these pics). Will have to play around with that to improve.

Also test fitted one of the harnesses to see what fixings it would use as will need to know for fitting the boot box.

Counters
Site Counter