Two Go Mad In The Garage

How two numpties try to build a Westfield kit car.

Thursday, December 29, 2005

The Engine is in - phew!

Little actual progress yesterday, Tim made the four hour round trip to Westfield in Kingswinford to pick up a bag of missing bits including the vital prop shaft bolts - thanks to David in stores for his help and patience.

Then Tim and eldest daughter had to brave the sub-zero temperatures for a quick trip to Highbury to watch a satisfying 4-0 victory over 'appy 'arry's Pompey mob.

Today was the last day we had the engine lift so we had to crack on....

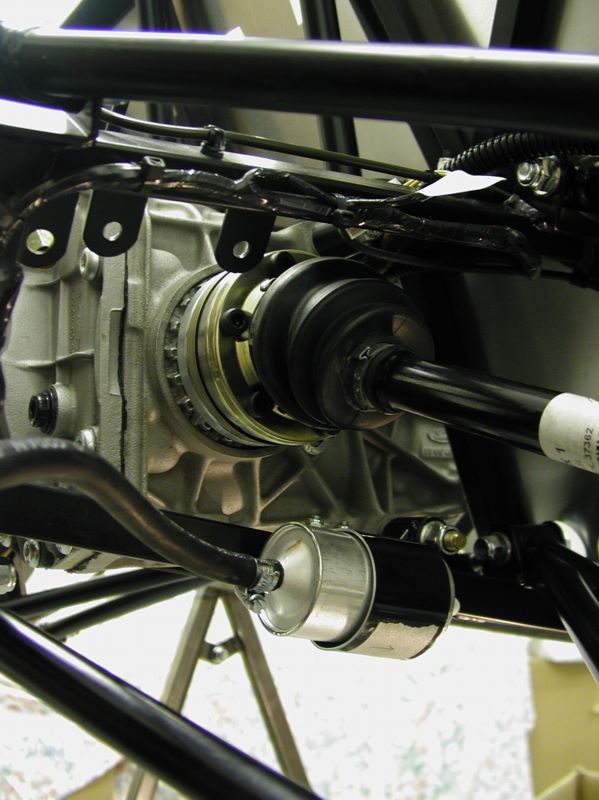
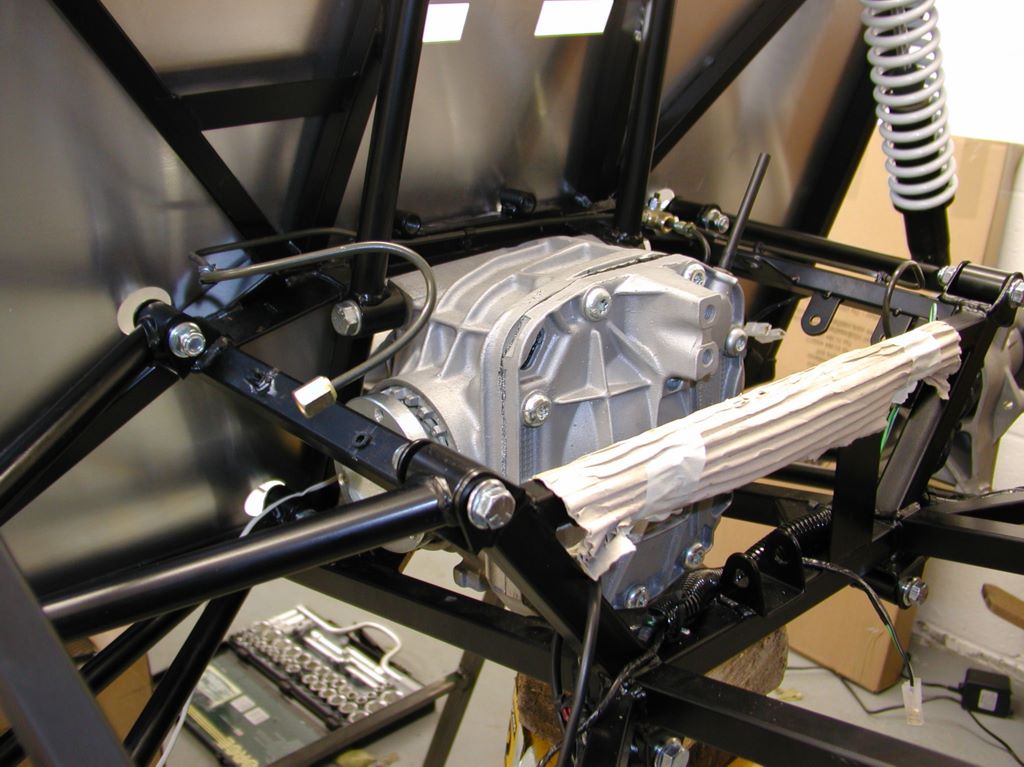
First the propshaft was fitted to the diff, actually not too difficult as jobs go, although one of the bolts we found impossible to get a tourque wrench on and had to just do it as tight as a ratchet spanner would allow (on the basis that that was bound to be less than 35lbft).

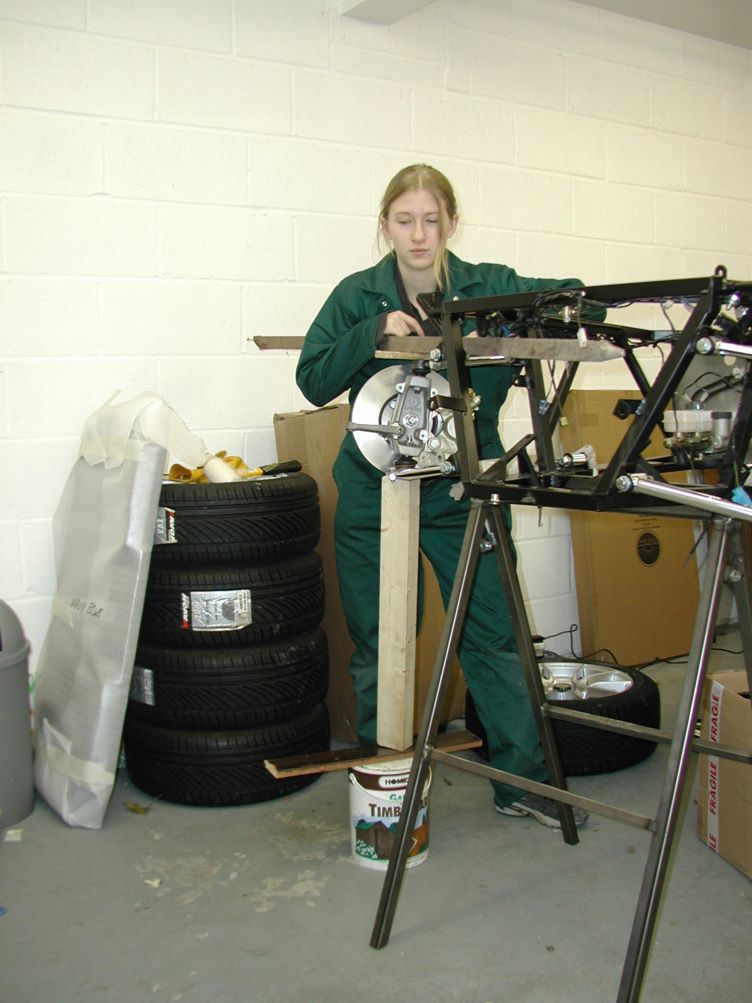
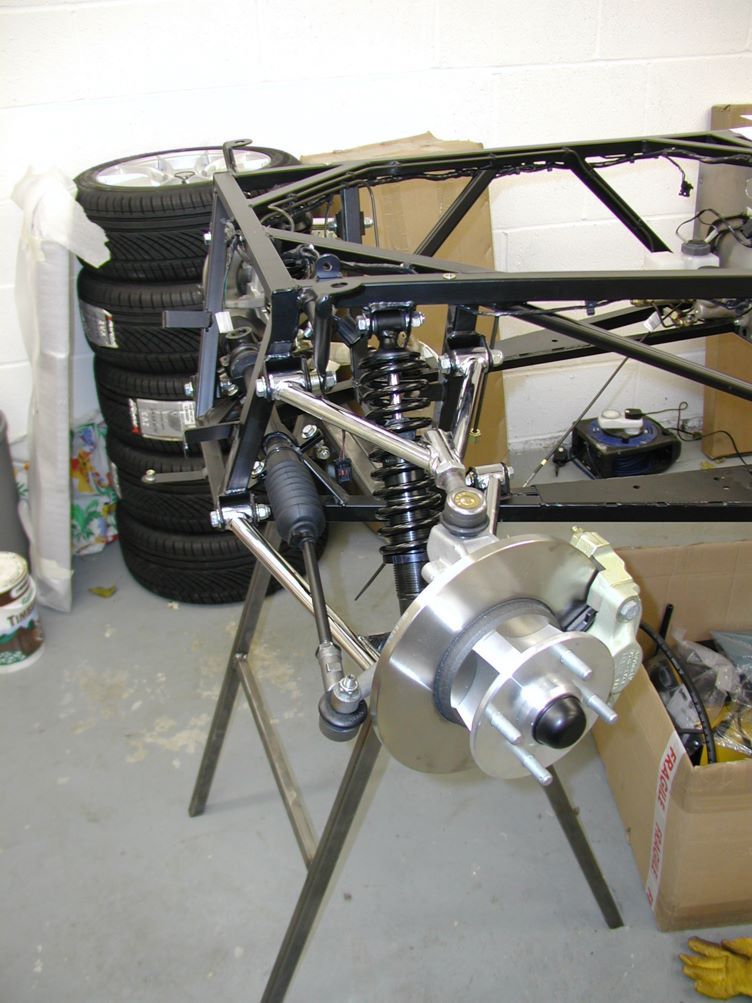
Then we had to lower the chassis onto axle stands, we did this as a three part move, firstly we lifted the back of the car an inch using the engine lift....


Then we took the chassis stand out and lowered the rear of the car by about 50cm, we then manually lifted the front of the car onto low setting axle stands (wanted the front of the car to be lower to allow easier engine fit)


Then we lowered the rear of the car via the lift onto two other axle stands that were on highest setting.


Again this operation seemed to go fairly smoothly we borrowed wife and eldest daughter [Jenny] to help with lifting front of car down and that was actually quite easy. [Third daughter Anna was the photographer for all the pictures you see here (very good indeed considering she is only 9 years old)]

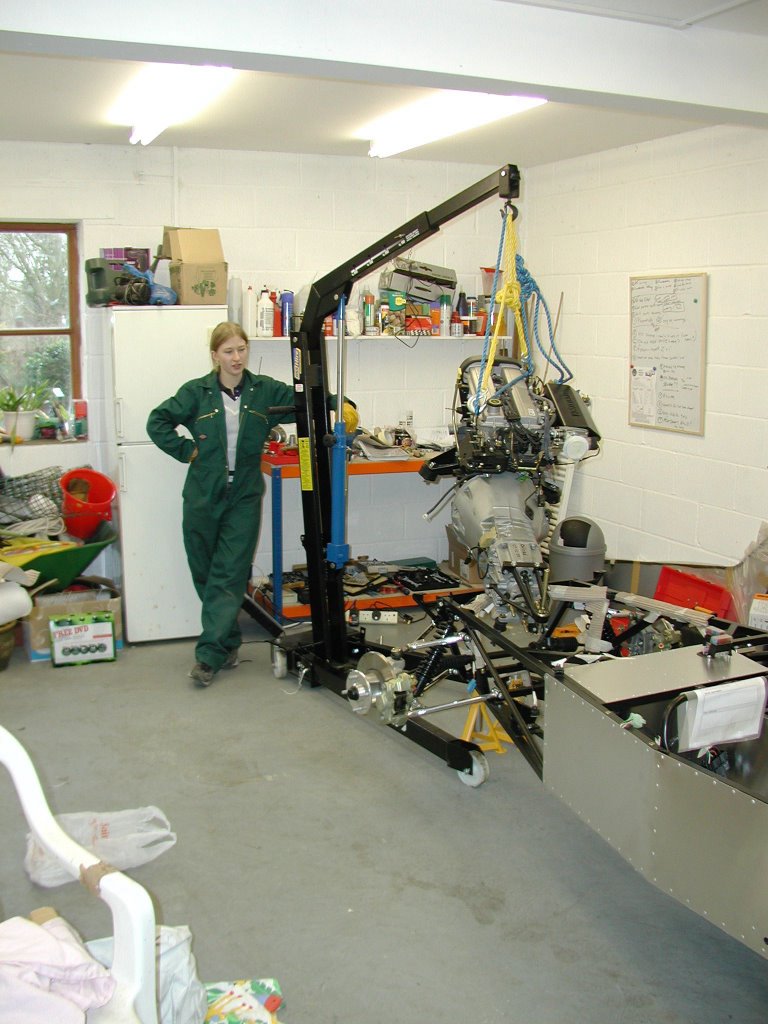
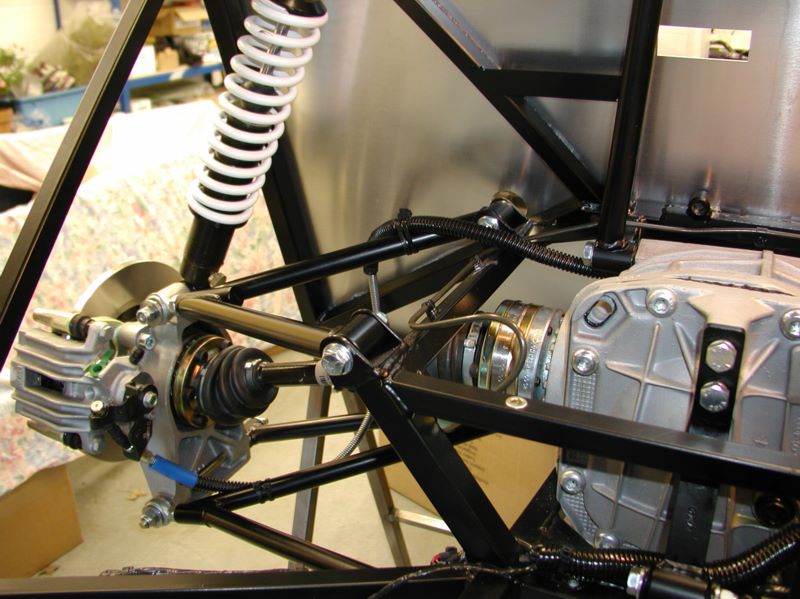
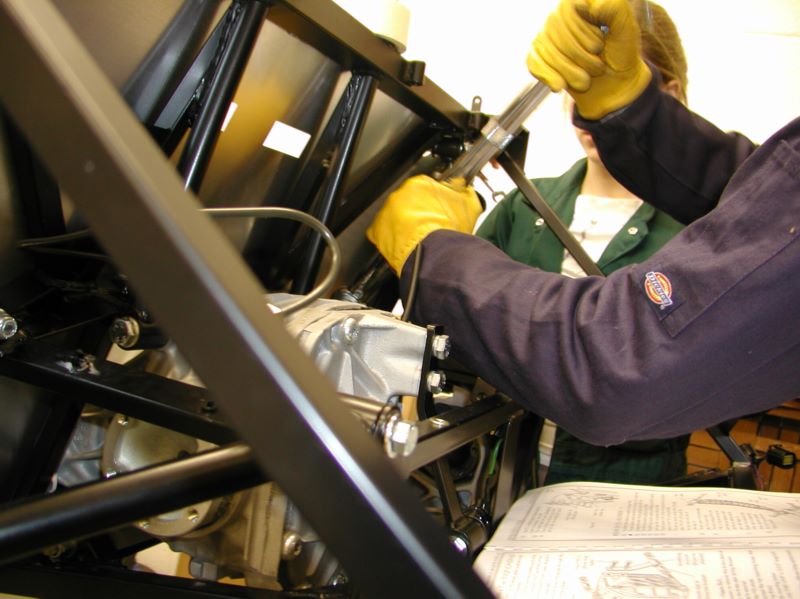
Finally the real pig of a job, was to fit the engine....

Here you can see master lift operator Chrissy with her charge, we found that a 5.99 two tonne tow rope from Halfords was a useful sling, as it comes equipped with metal hooks and spring clips at the ends. (it's the yellow rope in the picture, the blue rope is just 'belt and braces')....


It was an extraordinarily tight fit, many thanks to advice from other Westfield builders, particularly Fraser White and KerryS for their prompt responses to our calls for help on the WSCC website, in particular vital clues such as to use a trolley jack to push up the gearbox were invaluable, we owe you guys a pint or three....


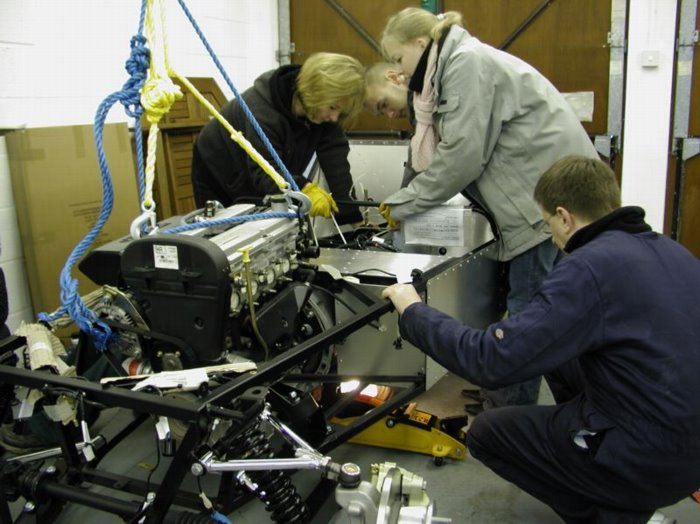
Just as we were starting to steam, Jenny's boyfriend (Tom) turned up out of the blue and was able to provide us that extra pair of hands that enabled us to locate the gearbox drive studs into the propshaft, by rotating and lifting the proposhaft while Jenny and Wife lifted up the gearbox, supported by a trolleyjack and with Chrissy operating the lift.

Tuesday, December 27, 2005

Slowly getting the fuel system in

Mounted the fuel pump and filter, today and wired the pump and isolater switch, then cut hoses to join tank to pump and pump to filter. Marked up some of the wiring loom, and put our remaining foam tape on the chassis where the tank will go. It doesn't sound much but took a total of 9 man/woman hours to achieve.

The pump was a real so and so to fix, the position was dictated by wiring lengths, position of diff support bracket and the way the pump sits in it's bracket. Even now the fuel run from pump to filter looks uncomfortable.

We are now worried about getting the engine in this week, as (a) don't think we have an oil pressure sensor that needs to be fitted prior to the engine going in (b) don't seem to have any prop shaft bolts that are also necessary before engine is fitted.

A trip to Dudley may be needed in the morning. let's hope that there is someone in at Westfield tomorrow.

Monday, December 26, 2005

Handbrake fitted, sort of...

We repaired the wiring loom to start with, after a boxing day trip to Homebase (yeuch!) to buy insulation etc. this was fiddly but seems to be done OK.

We sorted through the engine mountings to identify any that needed fitting so we could be ready for engine fitting as we only have the hoist 'til Friday. Found that the manual described the left hand engine mounting as pre-welded but in fact it wasn't, it just needed one bolted on that we found in one of the boxes.....

Then we went back to the handbrake, which Tim had managed to thread through the chassis holes eventually this morning, while Chrissy was having a boxing day lie in (slacker!)

We covered the cable with some 'convuluted piping' as it is called to protect it at points it either needs to be tied on or where it might rub on metalwork.


A break for two hours to see the mighty Arsenal sweep away Charlton with a crushing (errr... one:nil anyway) away win.

Then we returned to fit the cable on to the calipers and struggled for over an hour to loosen the adjuster sufficiently to prise the handbrake lever in to place and fit the switch, the handbrake even sort of works, but it doesn't seem even, when released the right hand caliper lever remains slightly depressed and the brake slightly on, but our arms and fingers were giving up and 'er indoors had made a pot of tea so we gave up for the night.

Man/Woman hours today = 7

For anyone else with a similar handbrake fitting, here is how I believe it should look (view from down the transmission tunnel):-


...and here is the routing at the rear hub....

Saturday, December 24, 2005

One step forward one step back

We are getting to really hate the Westfield manual, at every step the bits we have and the way you arrange them seem to be different from those described. We have temporarily given up on the handbrake, and decided to try and sort the fuel system out - which means attaching the tank to the pump to a filter to the feed pipe up to the engine bay and then attaching the return pipe back to the tank. (At least this is what we deduce - not from the manual but from other builders logs) - you also need to make some electrical connections to: the fuel pump, the fuel tank sender and to an inertia switch which will turn off the fuel pump in the event of an accident.

We decided to start by fitting the inertia switch to a panel behind the diff. This involved drilling some holes, which our new drill and drill bits made a lot easier than previous holes we had drilled. So inertia switch is ready to fit - BUT on the bottom were three male connectors in a square socket and on the wiring loom three female connectors in a round housing with two wires coming out - needless to say the two halves don't fit. The manual shows an inertia switch which DOES take the rounded female so obviously it was once right but they have sourced a different inertia switch.

So will have to cut off the nice connector and connect each wire individually - ok, but which two of the three connectors to connect the wires to? The terminals are decribed as 'NC', 'NO' and 'C'
the wonderfully helpful folks on the wscc website (see links) provided a solution inside an hour -

'NC' = Normally Closed
'NO' = Normally Open
'C' = Common

And the switch needs to be 'Normally Closed' and 'Common' connected, so that fuel pump normally runs and stops when the inertia switch is open.

Will need a soldering iron to sort though and I don't have one at the moment.

So we went on to fit the fuel pump, again it is different to the one shown and so positioning it was tricky for various mechanical reasons. We decided to mount on the same bracket but lower down and on the other side from the inertia switch - this meant using a hand drill as the electric one wouldn't fit except at an acute angle. Hand drilling was hard work but eventually went through only to scuff the wiring loom on the other side (Tim wrongly thought it would be cleared) and damage a wire within it which will now need repairing) - oh bother! - or similar words.

Friday, December 23, 2005

handbrake problems

Any help gratefully received , can't see how to get the cable through the hole - I *assume* the cable adjuster butts up against the back of the chassis strap with the hole in it, but the armour of the cable won't go through the gap at the bottom of the hole?

Wednesday, December 21, 2005

DriveShafts and Brake Calipers


Today we fitted the drive shafts and brake calipers. This continued the theme of confusing information, in that the drive shafts were apparently helpfully labelled left and right, but they just didn't seem to fit, another phone call to the factory elicited the information that a batch had been labelled wrongly and yes the 'RH' one should go on the left hand side.

This was aparrently a simple enough job but it took us several hours and a lot of effort to get all 24 bolts in loctite'd and torque tightened. unfortunately we graunched two of the bolts due to the difficulty of getting the allen key/torque wrench in the difficult angles. s'pose if they have to come out again we may need to cut a slot in to the top with a hacksaw and use a big screwsriver.

Brake calipers went on fairly easily and we quit for the day feeling exhausted.


Monday, December 19, 2005

It's called a 'diff' because it's difficult to fit...

So after spending yesterday watching Arsene's brave boys mugged by Chelsea back to the build..

Time to fit the Differential, a really good explanation of what it does can be found here in between a lot of annoying adverts...

http://auto.howstuffworks.com/differential.htm

It is difficult to fit because it is very heavy and because one of you has to hold it at arms length in the middle of the chassis while the other knocks long studs through it to secure it in place.

Duh! well at least that's what it says in the manual - and that's what we see Mark Evans doing in the video ("A Sportscar is born") and sure enough there are two studs supplied with the kit.

A serious numpty moment for us now as I trial fit the studs through the bushes but not the diff (worriedthey will be too difficult to get out), then have a go, many minutes and much pain later Chrissy tries knocking the top stud into place and it get's stuck very quickly - new vocabulary is tried out but eventually have to give up (my back was giving up anyway) and retreat by knocking it back out...

...only to find *this* diff actually doesn't take a stud at all at the top at all it has two threaded blind holes for a bolt each side at the top one of which we have now severely graunched by trying to hammer a stud into it. It should be said in our defence that this is a redundant stud supplied with the kit the sole purpose of which is to fool the unwary who haven't 'measured twice' before they pick up the hammer and drift.

...a phone call to Westfield, to find (a) the ever helpful Mark is now away for 2 weeks (b) probable solution is to drill out and fit a helical, which we are unlikely to get now with the Christmas break so that would mean no building for two weeks - darn!

However the local auto parts store has an apology for a tap and die set (if anyone ever makes a plastic "My First Tap and Die Set" for five year olds, it will probably be less crudely made than this)..anyway it does the job, we lose the first couple of turns of the internal thread, but there is still plenty left (we hope)...

Praying to many deities that the damaged side doesn't strip as we tighten the relevant bolt seems to work and we get the diff fitted and torqued down - to any other builders out there yes the bottom one is a stud, only the top fitting is bolts!

Pictures below,

little further building today as need a socket converter to torque tighten the drive shaft nuts, and can't get that til tomorrow.


Saturday, December 17, 2005

We hate suspension tapers!


Finally have got the front suspension fitted: The top ball joint fittings (the things which connect the car to the wheel hubs in a way that allows the hubs to steer the car) were absolute so and so's. The only way to tighten them is to compress them so that they can't rotate as you tighten the lock nut - here is our technique -


Chrissy is looking relaxed here but only becuase she is posing! in fact it took all our meagre effort to compress and tighten - and about an hour and a half of blood sweat and tears.

I just pray that we don't have to take them off again later.

We have also now moved on to the relavtively easy part of mounting the steering rack and the upper steering column -

you can see it all here -

Thursday, December 15, 2005

Slow Progress with suspension

Starting to make a little progress, we have fitted the rear suspension, but only after discovering that the manual is wrong, it says that the rear uprights should be bolted on, after an hour of two fighting with this, a phonecall to Westfield revealed actually the manual should be ignored and the bottom of the uprights fitted on a bronze coloured stud as shown in the picture

so having got the rear suspension on eventually (fitting the damper units on inside out was not too clever) we moved on to the front suspension...where we had a little fight with the headlamp mounting brackets that need to be bolted on to the same bolt as the top front wishbone, since at the other end they are bolted in to a clip that I guess cannot be welded to the chassis with great tolerance a good degree of persuasionis required. Eventually a phone call to Mark at Westfield gave a good tip, bend open the welded clip a bit (that's what screwdrivers are for isn't it) and then fit the bottom of the bracket over the bolt on the wishbone and then 'persuade' the top into the clip with a soft headed mallet...

The offending item is shown below...


Our next journey of discovery was to realise that the top wishbones are not symmetrical and that we had put them on the wrong way around (top tip- read ahead in the manual), so off they came again and were refitted.

then we cleaned off the discs (white spirit gave us both headaches) and tryed fitting the front uprights, this was a real pig as (a)spanner, ratchet spanner, socket access were all virtually impossible (b) the top ball joint connection seems to come with a special lock nut which seems to lock on the last thread making it impossible to fix properly, worse the threaded part of the ball joint just seems to go round - oh well had enough for today...if we carry on we'll probably just break something...


Sunday, December 11, 2005

What a lot of bits

Spent several hours tidying up from yesterday - limbs all aching (I guess from struggling to get engine and gearbox out of the van and into garage).

Tried to reconcile the thirteen page parts list to the boxes and packages we had received, this was a fairly impossible task as (a) many things came without any identification (b) the parts list has wonderfully descriptive identifications such as "cy wing brkt ali upmk3 LH EPX" - now ok I can work out out that this is probably a left hand aluminium wing bracket but still it is a bit of a pig to work out what that is in amongst best part of 1000 parts. Marking the parts with their stock codes would seem too obvious!

After several hours we realised that full reconciliation would probably not be posibble at this stage - and, hell, we wanted to get building, so having worked out that most of module 1 and 2 parts were in one box we decided we would start...

And yes we have fitted the rear left hand wishbones - whoppidooo!

Work/school tomorrow (boo) and even worse some business dinner in the evening for Tim (double boo) so no building now 'til Tuesday night.

Saturday, December 10, 2005

It's here....and we are exhausted!

Yep it's here -

up early to get to the factory - we still arrived 40 minutes later than I had thought.

What a big pile of bits there were...


oh god that engine and gear box look heavy I am going to worry for the rest of the day that we won't be able to get it out of the van at the other end.

Fantastic help from the people at Westfield, they had so much experience in packing vans that we were as much in the way as helping.

Chrissy's boyfriend Richard came along...but he didn't get much conversation as she slept virtually all the way there and back.

Top tips for any prospective buyers -

(1) Get a big van and get one with a tail lift
(2) Have lots of help to unload especially the engine and gearbox
(3) take blankets to wrap stuff in but also take straps/rope to tie the engine down with...we of course didn't and had to pop down to the FOCUS store that is 300yds from the factory to buy some rope.

Tuesday, December 06, 2005

We're ready...


OK, the workbench has been built, the vice has been fitted, some shelving has been built the lights are in and most important of all the garage has been cleared of cr*p.

here is a picture....

Counters
Site Counter